
A 10 feet gate has to withstand a lot of pressure. The wrong sized hinges and screws can lead to a wobbly gate that will fall over. A badly fitting gate can also be a hazard for people walking past it. Here are tips on how to build 10 foot gate.
Building a 10 foot gate is not as hard as you think. In fact, take the idea of building a 10 foot gate and apply it to most DIY projects and they get a lot easier. That’s because using simple logic and applying basic tools, you can accomplish amazing things. This article shows you how to build a 10 foot gate in two different ways with step-by-step instructions and pictures for each method.

How to build a 10 foot gate
A 10 foot wide wooden gate is the perfect addition to your home. Whether you are looking to create a personal entrance in your backyard or want to add security and privacy on your property, this guide will help you build the perfect gate.
Step 1: Build the frame
The first step in building your 10 foot wide wooden gate is to build the frame for the gate. You can use any type of wood for this project, but we recommend using pine or cedar because they are more rot resistant than other types of wood. Grab your 2x4s and cut them down into 4 foot long pieces. These will serve as your vertical posts and need to be spaced evenly apart from each other across the width of your gate opening (8 feet). Attach these posts together by driving a screw through each post and into its neighbor post. Make sure that you leave about an inch of space between each post so there is room for insulation later on in this project! Once all of your posts have been attached together at one end, place another 2×4 horizontally across all posts at this end in order to create a “header” for attaching other pieces later on in this project (see picture below).
Building a gate is not as difficult as it might seem at first. The key is making sure that every piece of wood fits perfectly with the others, so there are no gaps between them. This project will take two days, but only if you have all the materials you need on hand. You can use any type of wood for this project, but cedar or redwood will last longer than pine or fir.
Step 1: Cut the Wood
Cutting out all of your pieces should take about one hour if you have a miter saw and a table saw. If you don’t have those tools, ask someone who does to help out with this part of the project. Before cutting anything out, measure twice and mark once so you don’t waste any material or cut too much off of each piece. When measuring, make sure that all measurements are taken from one end of each piece; this will make it easier to get everything laid out correctly on your workbench before cutting it down into smaller pieces. Once all of your pieces are cut down into manageable sizes, sand them down so they aren’t rough anymore and then wipe them
The first step in building a 10 foot wide gate is to determine the exact size of your gate. For example, if you want a 16 foot wide gate, you must determine exactly how many feet are necessary to achieve this width. The next step is to make sure that your hinges and latch will fit properly. You can buy these items at any hardware store or home improvement center.
Use 2x4s for the frame and 2x6s for the top rail. Cut each piece with a circular saw or power miter saw. Be sure to wear safety glasses when making cuts with power tools. The next step is to drill holes for the hinges on both sides of each panel and attach them with screws or nails into place.
When attaching the rails, place them between two panels so that they overlap slightly in the middle of each side panel. This will ensure that there is no gap between rails at any point along the length of your gate surface area.
Once you have installed all of your rails in place, it’s time to install any additional hardware such as latches and locksets which should be attached using screws or nails into place at this point as well
When you build a gate, you need to consider the following things:
The type of gate. The type of gate that you are building will determine the materials that you will need. The size of your gate will also determine the type of material that you will use.
The amount of money that you have available for the project. The amount of money that you have available for building your gate will determine how much time and effort you put into the project. If you have a limited budget, then this could affect how much time and effort you put into the project.
The style of the gate that you want to build. There are several different types of gates that can be built with different styles such as arched or flat tops, etc., so it is important to think about what kind of style would look best in your yard or driveway area before deciding on a design and then going ahead with building it.
What type of wood should be used for building a 16 foot driveway gate
There are many different types of woods that can be used when building a 16 foot driveway gate but some types are better than others depending on how long they last in different climates and how much maintenance they require in order
How to Build a 16 Foot Driveway Gate
The following article will guide you through the process of how to build a 16 foot driveway gate. This project is designed for someone who has some experience with woodworking. The instructions in this article are based on my personal experience and have been tested by me personally. There are many different ways to build a driveway gate, so you may want to improvise as you go along if you feel that your way is better than mine.
1. Digging the post holes
Digging the post holes is one of the most important steps when building a gate because it will determine where your posts will be located and how deep they should be buried underground. If you don’t dig deep enough, your gate won’t stand straight and sturdy; if you dig too deep, then when it rains water will accumulate in the hole causing damage to your posts over time or even break them completely due to their weight being too much for them to handle. To prevent this from happening, we recommend digging holes 2 feet deep with 2x4s measuring 12 inches longer than the height of your gate plus 1 inch extra for good measure (so for example if your gate is 10 feet high then dig a hole 11 feet long).

How to Build a 16 Foot Driveway Gate
A 16 foot driveway gate is a great addition to any home. Whether you’re looking for privacy or just want to add curb appeal, a driveway gate can be built in any style and size!
Step 1: Install the posts into the ground with concrete. Make sure they are level and set them deep enough so that they will not move when attaching the gate.
Building a gate for your driveway can be a fun and rewarding project. This guide will show you how to build a 16 foot long gate that is easy to build and install.
Before you start building the gate, here are some things you should know:
How to Build a Gate: The Steps
Step 1. Cut two 4×4 posts to 6 feet in height (the distance between the ground and the top of the gate). Then, cut two 2x12s into 4 two-foot long pieces and two 8-foot long pieces. These will be used as horizontal supports for the gate frame.
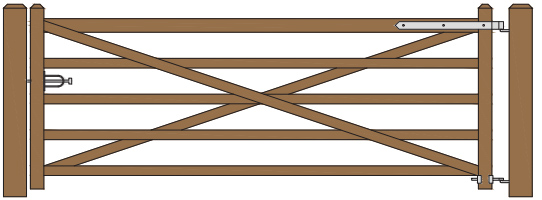
Step 2. Cut two 3/4 inch by 2 inch boards into 2-foot long pieces and drill holes about every 3 inches on them (this is where you will mount hinges later on). These boards are known as “gussets” and they are used to strengthen weak points in structures such as this one (they also add beauty!).
Step 3. Lay out your 4×4 posts in an “H” shape and nail together with nails or screws through each post into each other until it becomes stable enough to stand up by itself (this can take several hours). You may have
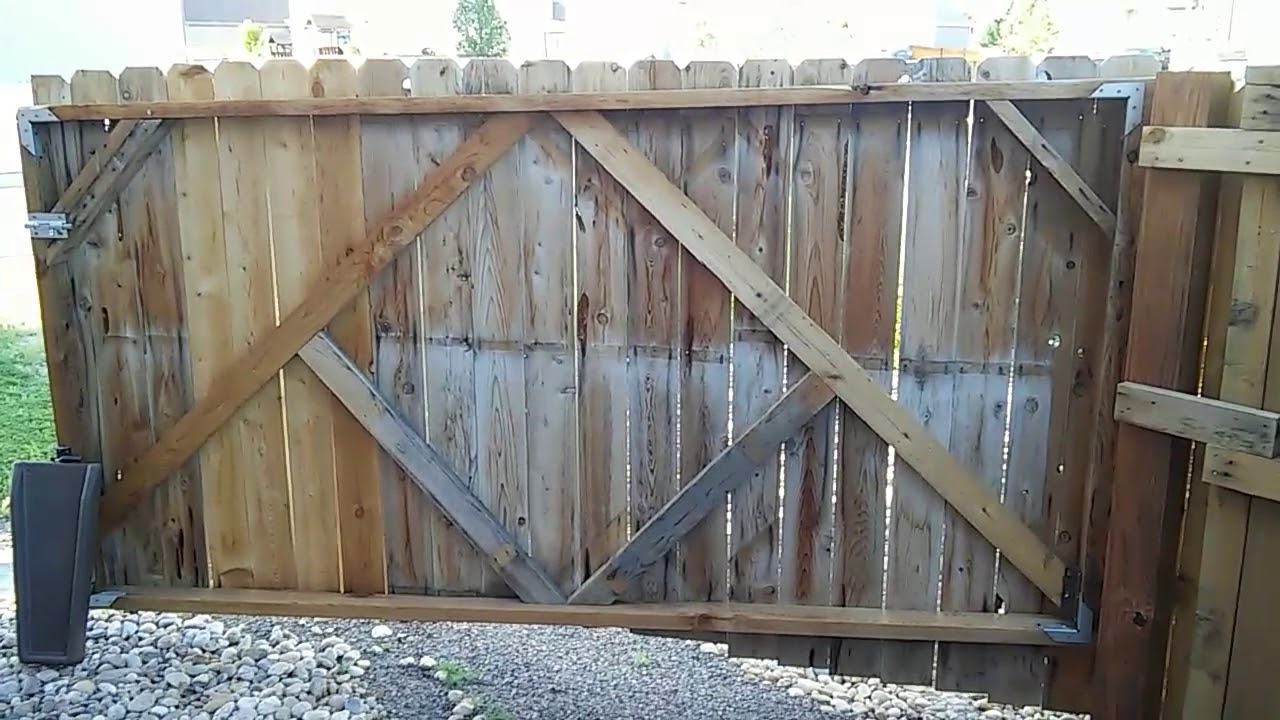
In this video I will show you how to build a 16 foot driveway gate. This is a 10 foot wide wooden gate. The wood that I used in the video was 2×4’s and 2×10’s. I also used some plywood for the gate face and some trim pieces.
I started by cutting all of my boards to length with my circular saw, then I cut them down to width on my miter saw. Then I cut them down to size on the table saw using an angle gauge as a guide. After that, I used some clamps and pieces of scrap wood to get everything lined up properly so that when I attached it to the posts it would be square.
Once everything was lined up, I screwed everything together using 3 inch deck screws. Afterwards, we stained all of the wood with a dark brown stain & polyurethane finish which turned out great!
I have built a lot of gates and I have been asked to write this article on how to build a gate.
I will show you how to build a 10 foot wide wooden gate, but the same techniques can be used for any size of gate.
You can use any wood that you like, but I prefer to use cedar because it looks good and it is rot resistant. You can also use treated lumber if you want. Cedar has some natural oils in it that make it rot resistant and termites don’t eat it very easily either.
The first thing that we need to do is measure our opening and get the correct size lumber for our project. In this case we are building a 10 foot wide gate for my driveway so we need two 6″x6″ posts, two 6’x8′ boards and two 4’x4′ boards. The posts should be pressure treated lumber because they will be sitting in water and exposed to the elements all year long (the water will wick up into the post). In addition, these posts will carry most of the weight so they need to be strong enough! The boards should be cedar (or whatever type of board you choose) because cedar doesn’t warp as much as other types of wood when
I’m building a gate to go on the driveway of my new house. The total width is 10 feet, but there are two posts that extend beyond that. I’m looking for plans for how to build a lightweight wooden gate.
I would like it to be self-supporting (no concrete). I don’t want to spend too much money since this will only be used for maybe 5 years before we move away from here.
If you want to learn how to build a gate, then you’ve come to the right place. In this article, I’ll show you how to build a wooden gate that will last for years and look great.
First, find out the size of your driveway gate by measuring from post to post. Once you know this, the rest is easy.
The following steps will teach you how:
Cut two pieces of 2×6 lumber into 6 foot long segments with a miter saw (if you don’t have one, check out my article on how to build a table saw). These will form the sides of your gate.
Fix one side piece onto each end of your 8 ft post using 2 ½ inch deck screws (I used 1 ½ inch screws when I built my gate but they didn’t work as well because they were too long). Make sure that when you attach these boards they’re level with each other so that they line up perfectly when we add our top rail later on in step 4 below).
A gate is a type of door that can be opened and closed. It usually consists of a swinging panel in a frame. In most cases, this is done by hinges on one side, but other methods include sliding panels (on tracks), folding doors, and pivot hinges.
How to Build a Gate
A gate is useful for keeping children and pets contained while allowing easy access for adults. They can also add beauty and security to your home. A basic gate consists of two vertical posts with horizontal rails attached to them.
Measure the space where the gate will go on both sides of the opening. Measure from the ground up to where you want the top rail to be. This will determine the length of your vertical posts or boards for attaching rails to them. Cut these pieces using power tools or hand tools such as saws and drills. If using boards, cut them into 4′ lengths so they’re easier to work with on site before installing them in place afterward.