A cornice board is used in finishing or covering the topmost trim of your window frame. It gives a finished look to the window and enhances its appeal and beauty. A cornice board can also be used to cover and finish other surfaces, like fireplace mantels or ceiling beams that may not have trim. A cornice board is cut from wide wood strips, known as moulding or casing. Cornicing boards are available in different designs, patterns and styles depending on the price, quality and design that
A cornice board with piping is a very common and traditional feature found in a lot of homes, especially older ones. It’s typically wooden and made to cover the gap between the top of your wall and the bottom of your window. Cornices are easy to make and hang, so you can easily get creative with them. However, if you’ve never put up any a home interior design project before, you might find the construction of a cornice board with piping slightly more difficult. In this short article series on how to make a cornice board with piping , I will walk you through the whole process step by step and share what I know about making these woodwork projects!
How to build a cornice
Cornice is a thin decorative board that extends from the wall above the window. It is used to conceal the junction between the wall and ceiling and to cover the exposed ends of wall framing or electrical wiring that are often left exposed. Cornices come in many different styles, but they all have one thing in common: they add beauty and elegance to your home.
In this article, we will show you how to build a cornice board for your windows with wooden moulding and how to attach it to your house.
Cornice boards are the finishing touch to any room. They can be used to hide a variety of things, such as heating and air conditioning ducts, electrical outlets and switches, and plumbing pipes. They can also add a decorative element to your room by using them over windows or around doorways.
Cornices are often used in conjunction with crown molding. Together they make a very attractive combination that helps define the ceiling line in any room. If you’ve ever seen a room with crown molding but no cornice board, it will look unfinished and unbalanced.
Cornices come in many different sizes, shapes and designs depending on what you want to accomplish with them in your home. To make one for yourself you’ll need some basic tools such as a hammer and nails or screws (depending upon how you’ll attach it), saws for cutting lumber into pieces that fit together properly, and other common tools like screwdrivers and measuring tape
A cornice board is usually made out of wood or plastic laminate, but there are several other materials that could be used as well if you wanted something different than wood or plastic laminate for your project
Cornices are the easiest way to add depth and character to your home’s interior. They can be made from a variety of materials, including wood, metal and vinyl.
There are many ways to build a cornice board, but let’s start with the simplest method: using 2x4s for the base and 1x4s for the decorative trim.
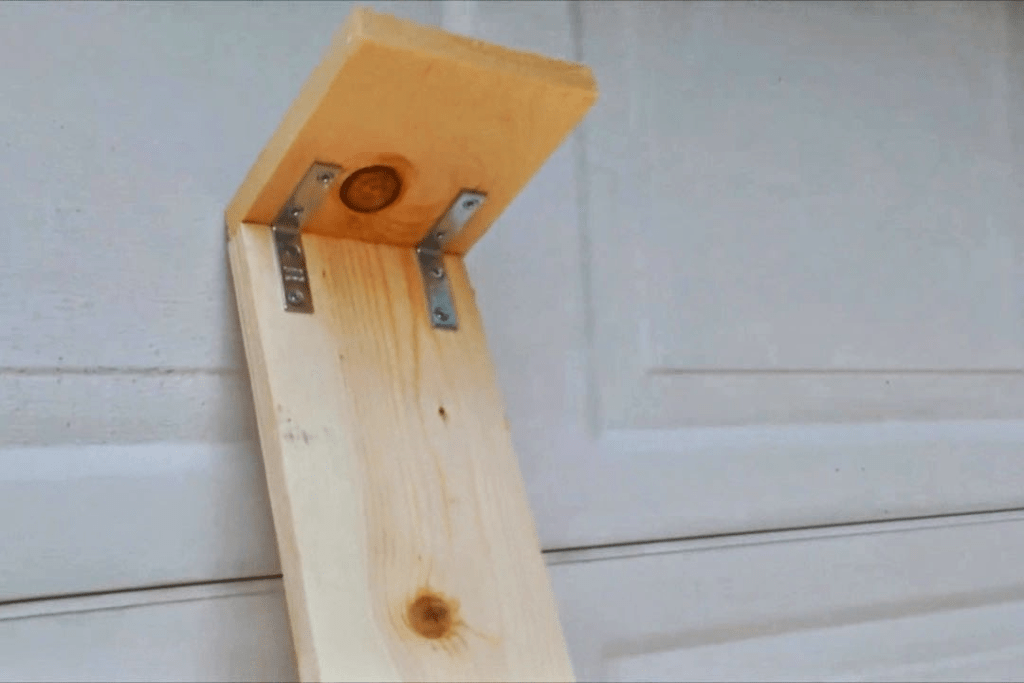
To begin, measure the height of your ceiling and cut two 2×4 boards that are 4 inches shorter than this measurement. Arrange them on their sides so that their corners meet each other at right angles. Nail these corners together with 3-inch nails every 12 inches along both edges. These will form the base of your cornice board.
Next, use a miter saw or circular saw to cut four 1x4s into 16-inch pieces (the length of one side of your cornice). To do this, place one end of a 1×4 against the edge of your baseboard and mark where its top edge meets your ceiling line; then measure down 1 inch from this line and mark again. Use these two points as a guide for cutting each piece of trim. On each piece of trim, mark at least four nail holes along its top edge — one at every 12 inches
A cornice is a decorative covering for the upper part of a wall, usually above the window sill. It can also be used to cover the joint between a ceiling and wall. Cornices are made of many different materials, including wood, metal, plaster, and plastic. They can be simple or elaborate in design and may be constructed as a single unit or as a series of panels that are joined together to form a continuous band around the room.
Cornices were originally used to protect walls from water damage caused by rain leaking through roofs. In modern times, their primary purpose is to enhance the appearance of the room rather than for functional purposes.
Cornices come in many different styles, but most share certain common features:
They are usually installed over windows and doors to conceal the junction where two sections meet (called miter joints).
They usually cover an entire wall from top to bottom with only small gaps at floor level (if any at all).
They typically end at or just below ceiling height so that they do not obstruct views or cause shadows when sunlight enters through windows or skylights below them.
A cornice is a molding that runs horizontally along the top of a wall, either just below the ceiling or with a crown molding that sits on top of it. Cornices are typically found in formal rooms such as living rooms and dining rooms, but can also be used in hallways and bedrooms.
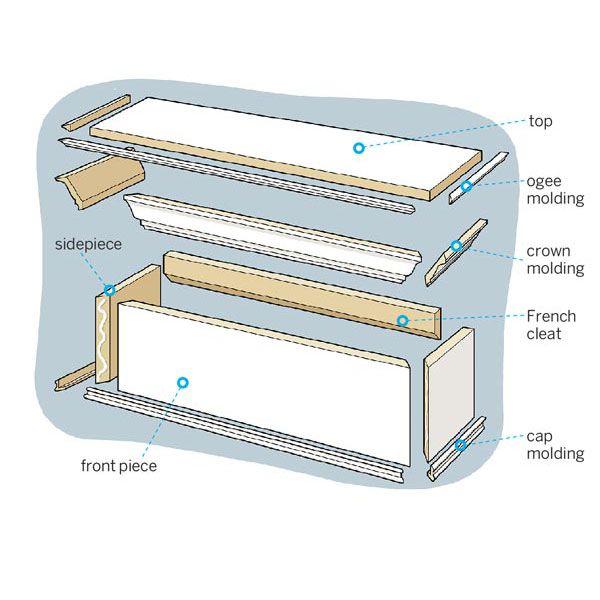
Cornices are made up of several parts; a baseboard, chair rail and crown molding. The chair rail runs horizontally across the bottom of the wall, while the crown molding sits on top of it. The baseboard is a strip of wood that runs vertically along the bottom edge of the wall.
The purpose of these different elements is to visually break up large expanses of bare wall space into smaller sections, which makes your room appear more inviting and cozy.
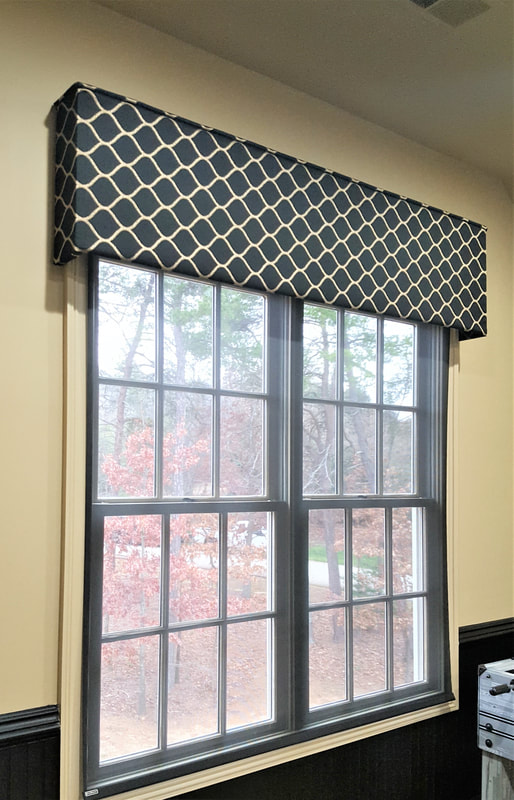
If you’re trying to create a custom look for your windows, consider adding a wood cornice board. Cornices are the finishing touches that make the difference between a room that’s just okay and one that’s truly beautiful.
Decorative wood cornices are available in many styles, including those with decorative moldings and shapes. You can also find them in many colors, from white to brown and black. To install your cornice board, you’ll need basic carpentry skills and some tools.
Before installing any window treatment, make sure the window is properly trimmed out (if needed) and the inside trim is installed correctly. If you’re going to be painting the wall around the window, it’s best to paint after installing the window treatment but before installing crown molding around the ceiling above it so that there aren’t any drips or paint splatters on top of your new crown molding!
how to make a cornice board with piping
Measure along the sides of your window from top to bottom (or bottom to top if necessary) and mark these measurements on each side of your cornice board with pencil or chalk line. You’ll also want to measure down from the top edge of your
Cornices are often used to enhance the look of a room, but they can also be useful in keeping the elements out. The right cornice board can provide both aesthetic and functional value to your home.
There are many different types of cornices that you can choose from when designing your home. They come in a variety of materials, styles and colors. You’ll want to choose one that matches your decorating style and adds a touch of elegance to your room.
There are several ways that you can add a cornice to your home. One method is by ordering pre-made cornices online or through local retailers. In addition, you can make simple ones yourself with just some basic carpentry skills and supplies. Here are some tips for making decorative wood cornices for windows:
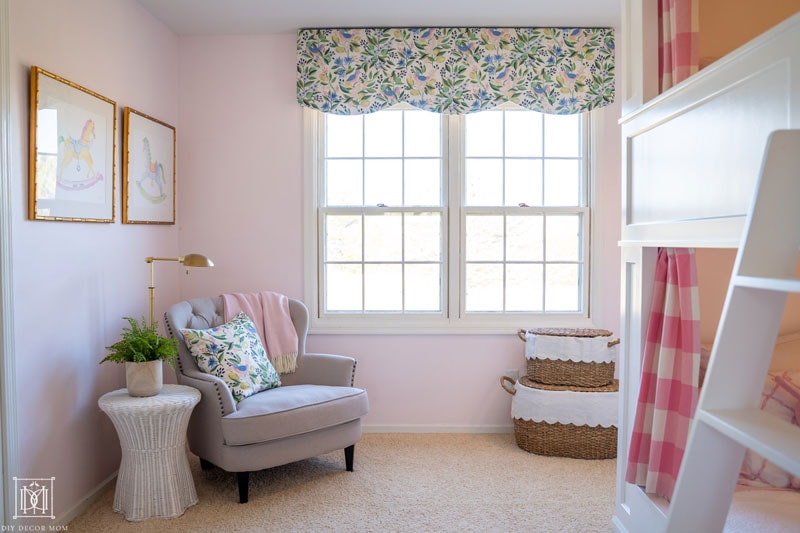
Decorative wood cornices are a great way to add character to your home. Whether you’re looking to add some pizzazz to the dining room or just want to spruce up your living room, cornices can be very easy and inexpensive to make. They are also a great way to increase the value of your home.
Decorative wood cornices can be made from almost any type of wood and have many different styles. The most popular styles are Victorian and Tudor, but there are other styles as well.
Wooden cornice boards are usually installed above windows and doors in order to give them a finished look. This helps block out drafts and keep rain out as well as giving an appealing look to the room.
decorative wood cornices for windows
There are many ways that you can make these types of decorative items yourself with only basic tools, such as hammers, nails, screws and saws. You can even add decorative trim pieces if desired for added detail or color variation.
Decorative wood cornices are one of the most popular ways to add a touch of elegance, charm and class to your home. They are made of wood, which is a highly durable material that can last for many years without any damage or discoloration. These types of cornices can also be customized according to your needs. Therefore, they can be made as per your room size and style requirements.
If you want to add some life to your windows, then you must consider buying decorative wood cornices for them. This article will help you know more about these types of cornices along with their benefits:
Why should I buy decorative wood cornices?
Decorative wood cornices not only enhance the beauty of your house but also increase its value. They give a new look to your house and make it more appealing. The following are some reasons why you should buy these types of cornices:
They give a modern look: Decorative wood cornices come in different colors and designs that can suit any style and taste perfectly. They are available in different finishes too so that you can choose according to your preference easily!
They are cost-effective: You don’t have to spend much money on these
For a window cornice, you can make your own or purchase one. The easiest way to make your own is to use a piece of wood and add the decorative trim around it. This can be done by hand or with a saw and router.
First, measure the length of wood that will fit on the inside of your window casing and cut it to size.
Next, place two pieces of wood together, with one on top and one on bottom so they are flush against each other. The top piece should have its edges lined up with the bottom piece’s edges so that when you flip it over, there will be no gaps between them. If you want to add trim to this side as well, do so before securing them together. Secure them together using nails or screws through pilot holes in the bottom piece only — not through both pieces at once!